

Documentation
Organisation
General
The overall project is organized with a modified version of SCRUM while the organisation within the small (sub-) groups in the team is not bound to this concept. To be able to specialize in one of the four subjects our project includes (Pointcloud rendering, pointcloud registration, modelling, networking) we split up into four small groups (2-3 members each).
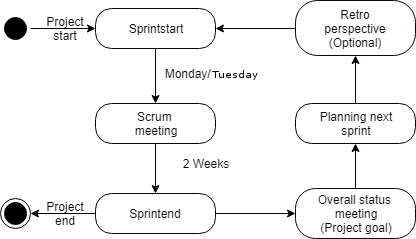
Every sprint starts with the planning of the sprint. During the sprint all teammembers meet on mondays and thursdays. This so called “Scrum meeting” replaced the Daily Scrums. In this meeting the members of each group are updated about the process, ideas and problems in all subjects/small groups. At the end of a sprint a big overall status meeting with the product owner (Rene Weller) was sceduled (Scrum Review). Then the next sprint was planned. The SCRUM Retrospective was optionally.
Sprint Planning
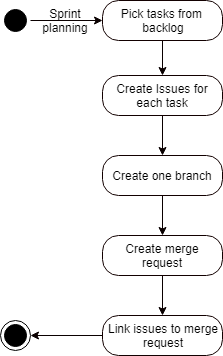
The only real modification to good practice during the sprint planning is the usage of one branch for all issues during one sprint. This was done because with the free version of Unreal Engine 4 blueprints can’t be merged. To prevent merge conflicts within one small group we used one branch for multiple issues during one sprint
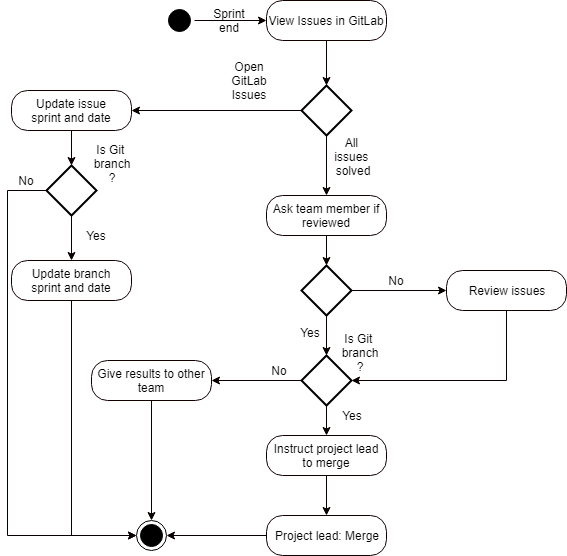
Sprint End
World Managers
CoralReefs world managers are placed as invisible actors in the level and control
certain aspects of the simulation.
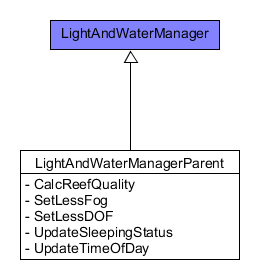
The Environment Manager replaced the old IEnvironment Manager inside the gamemode
and provides functionality for corals, algae and fishes. Another manager, the Light
and Water Manager controls water color and the day and night cycle.
It also replicates its values to the client.
Environment Manager

Light and Water Manager
Sea Animals
Pure Animations
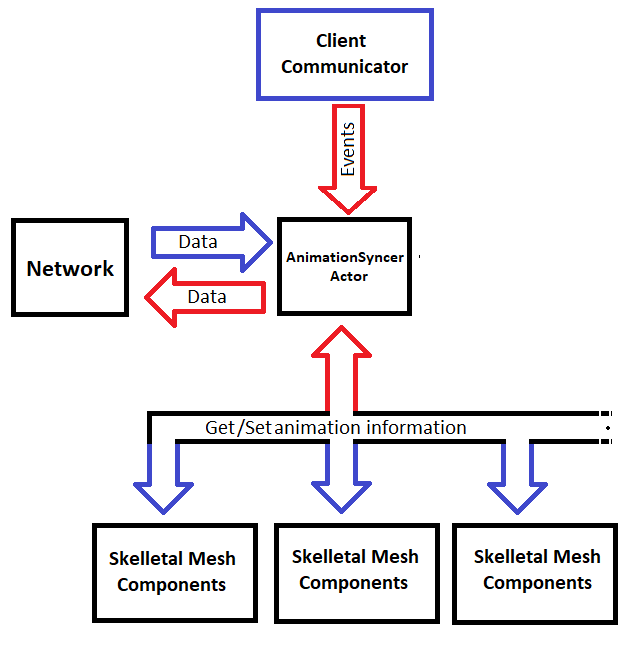
As explained in the section of the Client Communicator the event for triggering an initial update is located in the Client Communicator owned by the joined client. The server collects the animation progression for every pure animation in the level and sends the collected data to the currently connected clients (multicast RPC). This happens every x seconds (adjustable) or if the server receives the command to do so (initialization).
Dynamically moving
Since all the dynamically moving marine life shares the same structural implementation and just uses different calculations for movement and behavior, the method for replication can be the same for all of them.
All moving animals get spawned, despawned, hidden and updated by a corresponding manager which holds all important information and a specific calculation manager to process the changes to the position per tick for all animals spawned by this particular manager. A detailed description can be found in the documentation of the previous Coral Reef project ("Coral Reef 2"). Since predators and ground animals are actors instead of pure meshes (like swarms and individual fish) they have some overhead and computation within the spawned objects. The client does not need this and will spawn reduced versions of this actor.
All managers for the four types of moving marine life (GroundAnimals, IndividualSwarms, Swarms, Predators) have a replicated array of transforms, ReplicationParameters and a AnimalReplicationCalculator. At the start of the game the manager initializes the AnimalReplicationCalculator with the values of the ReplicationParameters. Based on the given ReplicationParameters the AnimalReplicationCalculator selects the needed InterpolationCalculator.
Server:
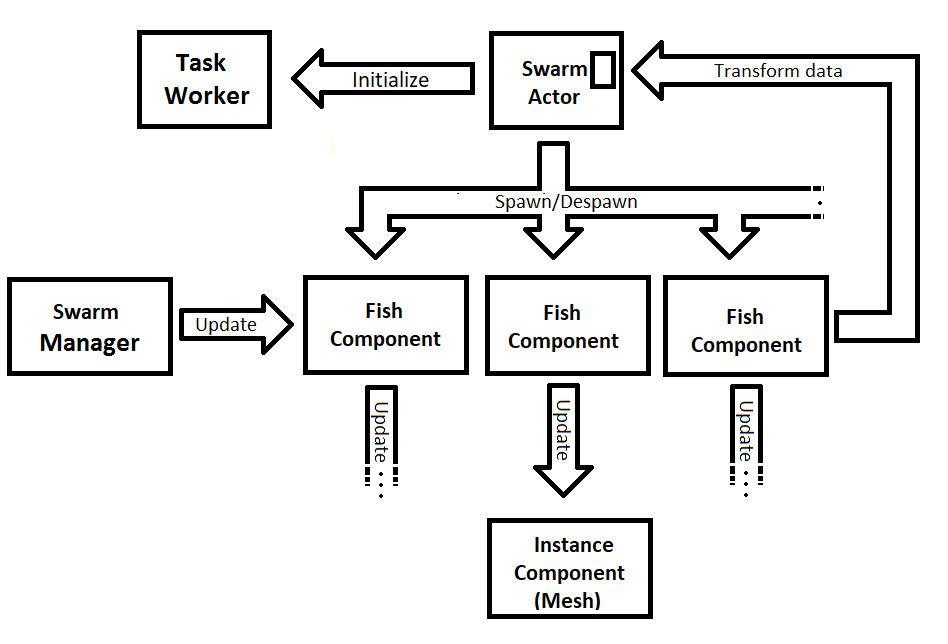
The Swarm Manager updates the FishComponents which are used to update the mesh position of the corresponding fish mesh. The only massive change to the server is the replication of the transforms of all instance components everytime the AnimalReplicationCalculator returns true on the call of Server_DoTick_Question.
		 // update fish and its components using the SwarmManager
		 SwarmManager -> Update (& FishComponents , InDeltaSe
		 // update fish instances after fish itself was updated
		 for ( int i = 0; i < FishComponents . Num (); ++i)
		 {
				UpdateFishTransform (i);
		 }
		 InstanceComponent -> MarkRenderTransformD
		 // Update replicated fish transofrm if needed
		 if ( ClientFishPositionCalculator -> Server_DoTick_Question (
					InDeltaSeco
				 for ( int i = 0; i < FishComponents . Num (); ++i)
				 {
									FishFutureTransform [i] = FishComponents [i]->
											GetComponentTransform ();
					 }
		 }
Client:
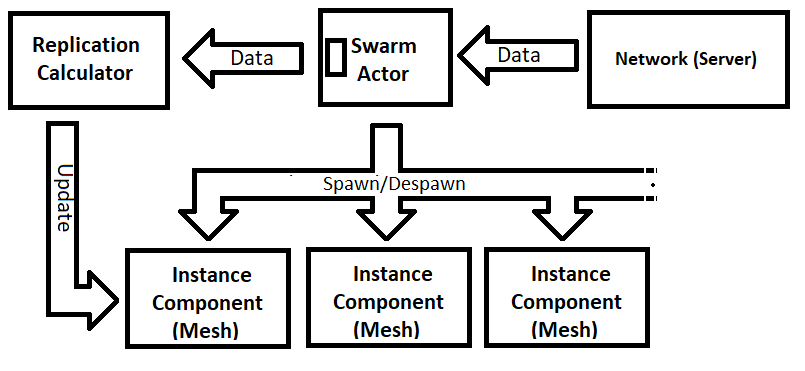
The Client does not have any SwarmManager and does not need to calculate forces. The position of each fish of the swarm gets updated every " UpdateInterval" seconds. If the replicated array, that contains all the transforms, has been updated, the OnRep\_FishTransform method gets called .
	 void ASwarm :: OnRep_FishTransform ()
	 {
				ClientFishPositionCalculator -> Client_PushNewTransform (
 						FishFutureTransform );
	 }
Every tick from the manager actor, the client will update the position of the fishes by calculating a new inter-/extra-polated position . The mesh components will be updated with the newly calculated positions.
if (!GetWorld()->IsServer())
	if (!GetWorld()->IsServer())
	{
			ClientFishPositionCalculator->Client_DoTick(InDeltaSeconds, false);
			 	for (int i = 0; i < SwarmParams.NumberOfFishes; ++i)
			 	{
				 	UpdateFishTransformClient(i);
			 	}
			  return;
	}
Corals & Algae
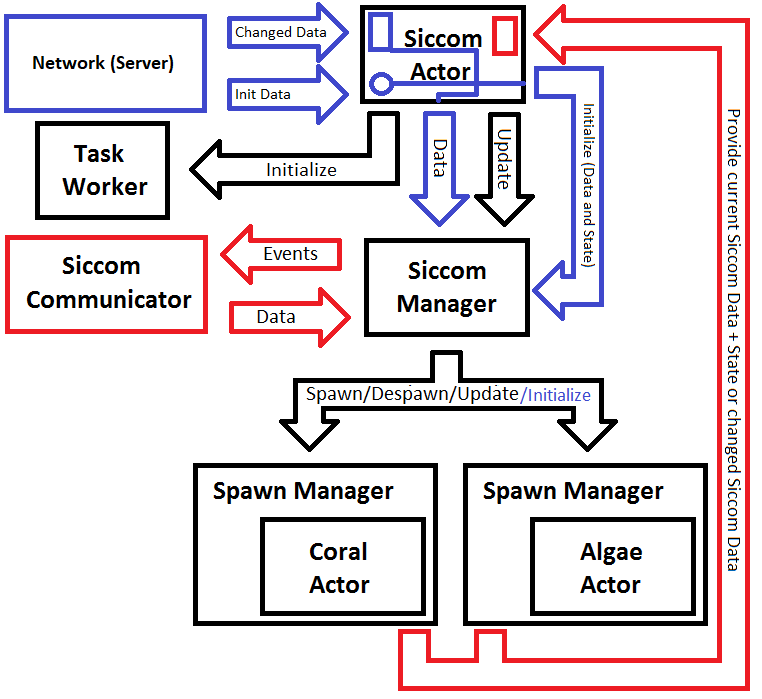

Before this project the game was purely singleplayer. When the game started, the
Siccom actor, that was placed in the level, just used the data
generated from the Siccom simulation to determine the evolution of the coral reef.
Based on this data the system spawnes, updates and despawnes all dynamic corals
and algae in the virtual world. Because the Siccom simulation provides data that
can't be the same for two instances, the server has to run the simulation and provide
the generated data to the client.
Following this idea, the client sends an RPC to the server upon spawning to request
the initial ticks and get the current state of the server. When the server receives
this call, it will sync all currently spawned instances to the client by sending
multiple RPC calls. Each RPC contains all currently spawned instances of a
one specific subtype of coral/algae.
This was done to prevent heavy network load when joining a game.
When initializing a client, the server will continue to send incremental
updates to the client, which contains the changed Siccom data since the last
update. The data used for these updates is a filtered version of the data that was
given by the Siccom plugin.
While a client is initializing its coral/algae data, it will only apply changes to
coral/algae types that have already been initialized, to prevent curruption of data.
After the initialization the client only applies the changed Siccom data.
If one package is lost, the changes to the corals will only be significant
if it was the command for a coral to die, because this command won't be repeated.
To prevent the emergence of big visual gaps between server and client, the server syncs all
died and despawned instances since the last sync with the client. Siccom now also reacts
on a parameter given to the game at startup.
InstanceGamemode

In the singleplayer version of the game
(previous project) the GameInstance did not contain any logic.
But the implementation of custom game parameters, debugging mode
, multiplayer etc. leaded to the implementation of some logic within the
GameInstance.
Because the parameters given to the game need to be saved when switching levels etc. the
GameInstance is the perfect place to save and load those parameters. Same goes
with the debugging mode.
Here a mixture of blueprints and c++ is used to enable easy access of parameters and the debugging mode
while switching modes in blueprints to prevent constant compilation of the c++ code.
The GameInstance also includes the logic to open the different types
of sessions (MainMenu, Singleplayer, Host, Join).
The GameMode got cleaned up and only holds the information of the currently connected clients.
Client Communicator
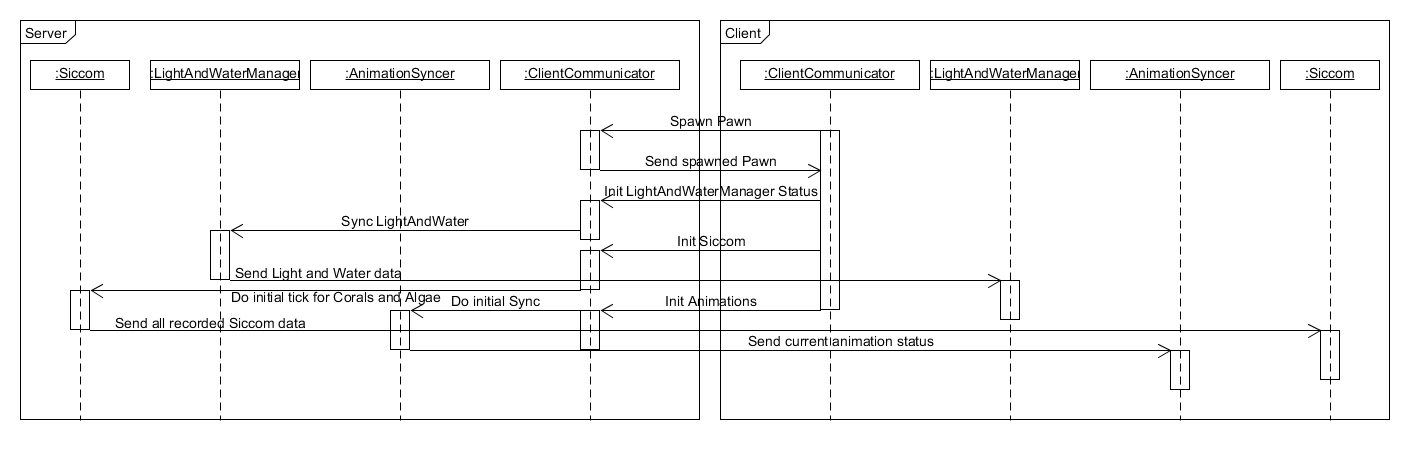
The “Coral Reef Multiuser Game” should support playing in VR and on a regular Computer monitor. If playing with VR the user should be able to choose between a Pointcloud representation and a normal model based avatar(diver). Because of this the game needs more than one type of pawn to be controlled by the player. Instead the default pawn (the Client Communicator) has to send a RPC to the server that contains information on which pawn to spawn and what parameters to use. This way the different functionalities can be splitted in different pawns. Because of the fact that Unreal can only receive RPC calls, which are explicitly for the server, if the server version of the sending object is owned by the sending player (pawns are automatically owned by the user that possesses them) the default pawn is the perfect way to directly communicate with the server. So the Client Communicator is used by the client to send all the needed server requests.
Registration
Segmentation was used to increase the network performance by decreasing the amount of data sent for generating a pointcloud.
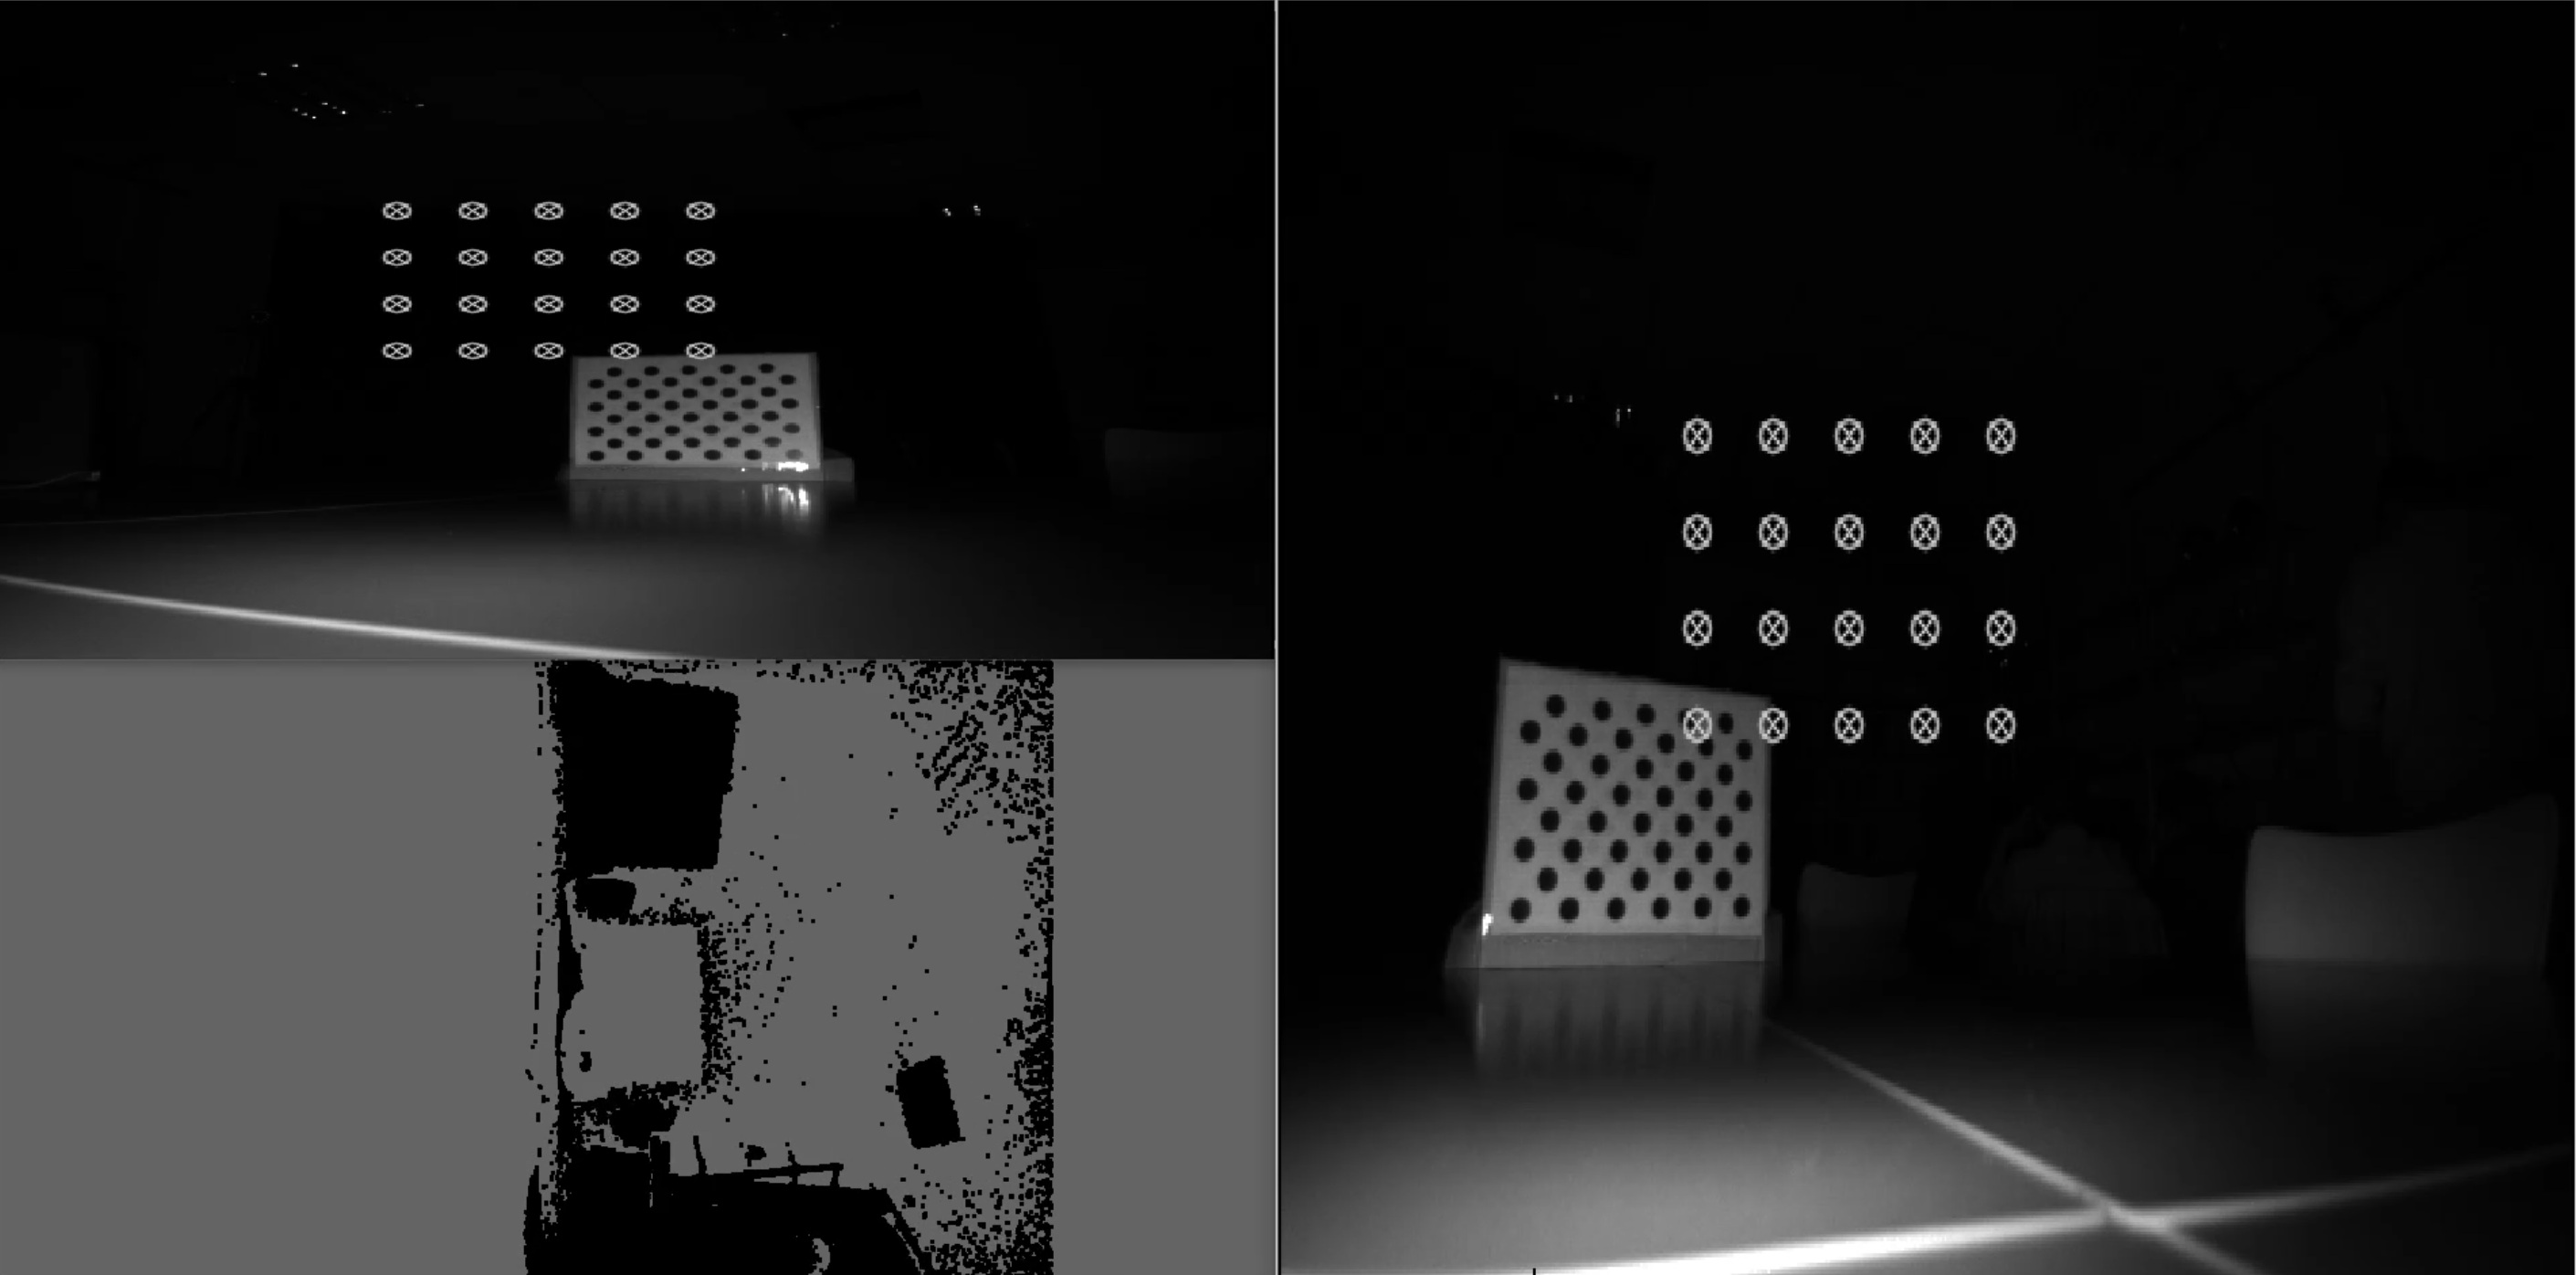
The most effective way of reducing the transported data is segmenting the picture from the background. The disadvantage of this method is the decreased playable area. The idea is to remove 10 cm of the background from the Kinect’s image. Then the player can still play the game and won't recognize that the playing area might be a bit smaller, as long as he is not standing very close to a wall.
To do this the room is scanned in a short initializing phase and the depth values for each pixel are saved. The initial phase has a duration of 20 frames. The livestream depth data per pixel is compared with the related pixel of the saved depth data. If the depth is higher or equal than before this point is removed. Furthermore this means, that the player is not allowed to stand in the image during the duration of the initializing phase, otherwise he might be filtered out.
The next important requirement was the registration, which means to use two Kinects instead of one and combine their images. One Kinect alone would not allow to produce a very detailed image, especially at the edges of the player’s picture. The combination of two Kinect images results in a more detailed image of the player for the CoralReef. To achieve this the images of both Kinects are be fused into one coordinate system.
To fuse the coordinate systems, both Kinects need to be calibrated with the help of an asynchronous pattern. The pattern will be located on both Kinect images and enable the calculation of a transformation matrix for each of them. With the help of these matrices the imagestreams of both Kinects are fused.
PointCloud Rendering Pipeline
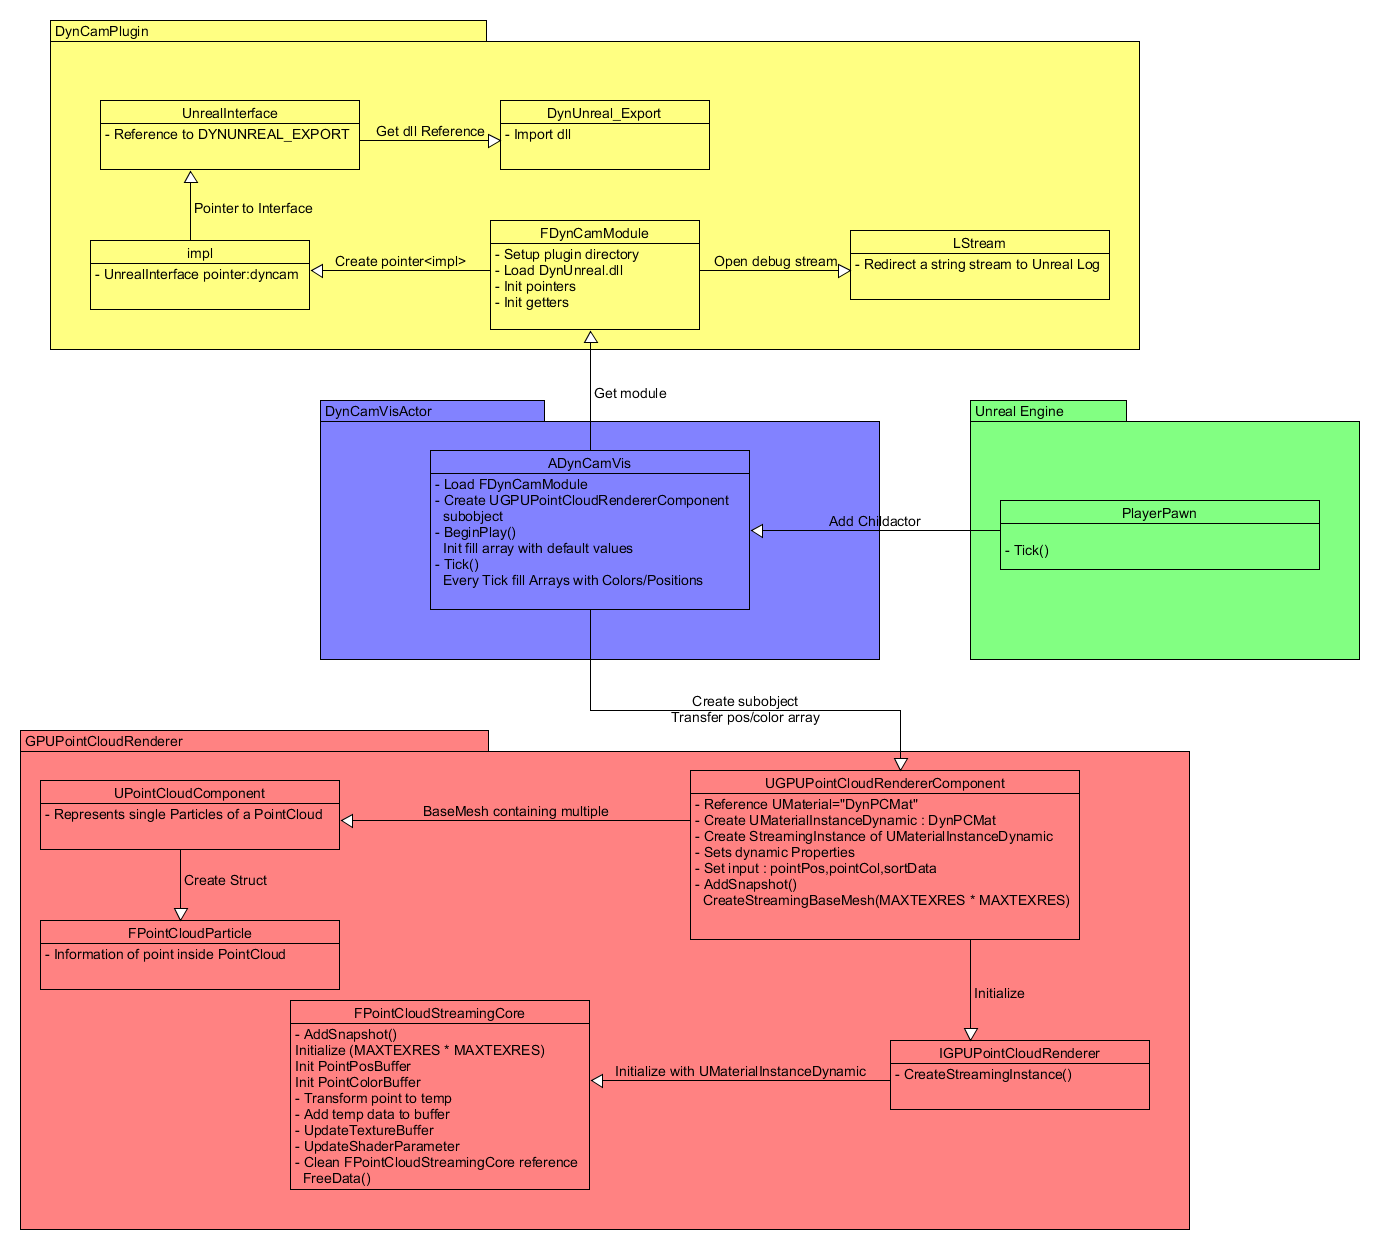
As shown in Figure 1 above there are 4 main parts in our Rendering-Pipeline. Starting with the input of the Kinect which will be processed trough the DynCam application which functionality is provided in the DynUnreal.dll which is defined in the DynUnrealExport header file. The UnrealInterface has a reference to the DynUnreal, specifically to the dll.
It also is part of the impl class which gets set up with a pointer from the FDynCamModule. The FDynCamModule sets up the plugin directory, loads the DynUnreal.dll and initializes the pointers and getters. Also the module opens a stream to the UELog for easier debugging.
Following we got the DynCamVisActor which is the main interface between the DynCamPlugin, GPUPointCloudRenderer and the player pawn inside the Unreal Engine. The Actor is a child actor of the player pawn and enables the visual output of the recorded point cloud inside the Unreal Engine. The DynCamVisActor also loads the FDynCamModule to get the DynCam input and creates a UGPUPointCloudRendererComponent to render the point cloud, which will be displayed inside the Engine. Furthermore the actor can tick and fills two arrays every tick with colors and positions.
The UGPUPointCloudRendererComponent creates a UMaterialInstanceDynamic and a StreamingInstance out of it. In addition the UGPUPointCloundRenderer initializes the IGPUPointCloudRenderer, which creates the StreamingInstance. Moreover there is the FPointCloudStreamingCore which transforms the points, updates the TextureBuffer, ShaderParameter and gets the UMaterialInstanceDynamic from the IGPUPointCloudRenderer.
Going back to the UGPUPointCloudRendererComponent, it is important that it initializes a BaseMesh out of multiple UPointCloudComponents, which represent single particles of the PointCloud. Following the UPointCloudComponent creates a Struct, the FPointCloudParticle, which holds the information of a point inside the PointCloud.
Combining Blender Models and Motion Capture Data in MotionBuilder Tutorial
Important: All steps need to be done in the beginning frame of the data!
First import the Mocap data as a c3d file into MotionBuilder. Drag onto the data an actor from MotionBuilder(AssetBrowser>Characters). The bodyparts of the actor have to be transformed that they match the points of the motion capture data. The next step is to create a markerset(ActorSettings>Create Markerset). Afterwards the points need to be assigned to the markerset. To make that process easier, hide the sceleton, turn on the xray mode with strg a and activate the marker selection mask. The points can be dragged with alt on the markerset. Then set the actor to active in the actor settings. Now the model from Blender can be merged with the data as a fbx file. While merging don’t import the takes and apply namespace. Afterwards merge everything with an in advance created character(in motionbuilder created). Drag the character on the root of the model. Then press „characterize“ and choose „biped“. On the character definition panel create a control rig and choose „FK/IK“. In the character settings set the input as actor and on activ. Then plot the character on the control rig.
For excluding body parts from the motion capture, change in key controls the keying mode to body parts. Select the to be excluded body parts from the rig and choose at Animation>Clear Selected> All Properties, to delete the animation from these parts. Before deleting, the selected body parts need to be in a position they are supposed to have afterwards.
Used Sources
• Anchor, Information, Sun, Swimming, Coral, Eye, Map icons made by http://www.freepik.com from http://www.flaticon.com is licensed by http://creativecommons.org/licenses/by/3.0/ • Moon icons made by http://www.flaticon.com/authors/chris-veigt from http://www.flaticon.com is licensed by http://creativecommons.org/licenses/by/3.0/ • Thermometer icons made by http://www.flaticon.com/authors/vignesh-oviyan from http://www.flaticon.com is licensed by http://creativecommons.org/licenses/by/3.0/ • Megaphone icons made by http://www.flaticon.com/authors/gregor-cresnar from http://www.flaticon.com is licensed by http://creativecommons.org/licenses/by/3.0/ • https://www.theodysseyonline.com/sea-turtles • http://www.dkspecialties.com/1619-renegade-aluminum-flashlight.html • https://gitlab.informatik.uni-bremen.de/tobr/VRCoralReefSiccomC • Caustic texture made by https://forums.unrealengine.com/member.php?36092-papptimus from https://forums.unrealengine.com/showthread.php?67673-Water-Caustics • Gerstner wave function made by https://www.youtube.com/channel/UC86KxTlE2K1BCF_nwneELUQ from https://www.youtube.com/watch?v=_y7Z0MbGOMw • Godray mesh, animatex textures and part of material are from unreal engine 4 Blueprint Office Example Project via UE Launcher • Part of water material and normal textures of water made by https://wiki.unrealengine.com/User:AndrewHurley from https://wiki.unrealengine.com/Water_Shader_Tutorial • One of the two flashlight light cone textures made by Blackmesasource from link is licensed by http://creativecommons.org/licenses/by/3.0/ • Ground textures are from http://www.textures.com and licensed by http://www.textures.com/terms-of-use.html and may not be released under Open Source licenses • Ambient Sound for the Reef is from https://freesound.org/people/akemov/sounds/255597/ • Whale Sound from https://www.freesoundeffects.com/licence.php • Whalemodel from http://www.cadnav.com/3d-models/model-29312.html • Coins from http://www.cadnav.com/3d-models/model-23643.html • Skiull from http://www.cadnav.com/3d-models/model-46123.html • Yacht from http://www.cadnav.com/3d-models/model-43627.html • Seahorse from http://www.cadnav.com/3d-models/model-10317.html • Camera from http://www.cadnav.com/3d-models/model-20234.html • DynCam Plugin by Christoph Schröder • UE4_GPUPointCloudRenderer by Valentin Kraft • Parallax Scrolling: https://keithclark.co.uk/articles/pure-css-parallax-websites/ • Download: https://www.w3schools.com/tags/tryit.asp?filename=tryhtml5_a_download • Automatic slideshow: https://www.w3schools.com/w3css/tryit.asp?filename=tryw3css_slideshow_rr • Scroll to Top: https://www.w3schools.com/howto/howto_js_scroll_to_top.asp • Accordion: https://www.w3schools.com/w3css/w3css_accordions.asp