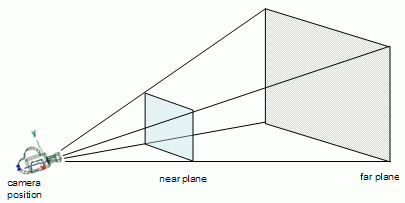
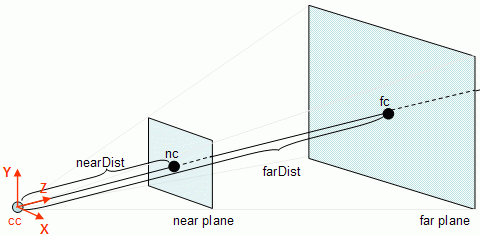
The view frustum is the volume that contains everything that is potentially (there may be occlusions) visible on the screen. This volume is defined according to the camera's settings, and when using a perspective projection takes the shape of a truncated pyramid.
The apex of the pyramid is the camera position and the base of the pyramid is the far plane. The pyramid is truncated at the near plane, hence the name frustum.
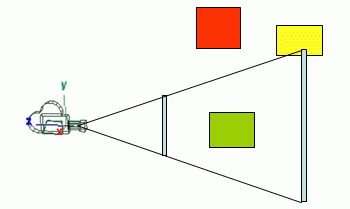
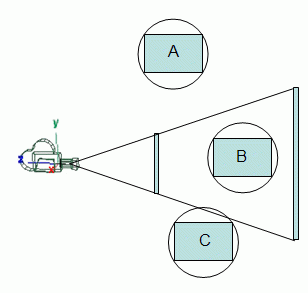
All the stuff that will potentially be visible on screen is inside, at least partially, the truncated pyramid, so there is no need to try and render what is outside the frustum, since it won't be visible anyway.
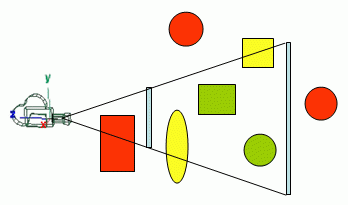
In the figure above all the green stuff (totally inside the view frustum) and all the yellow stuff (partially inside) would be rendered, whereas the red stuff will not be rendered. Note that the green sphere is not visible (it is occluded by the yellow ellipse), but it will be rendered anyway because it is inside the view frustum.
The goal of view frustum culling is therefore to be able to identify what is inside the frustum (totally or partially), and cull everything that is not inside. Only the stuff that is inside the frustum is sent to the graphics hardware. In the end, all that is asked of the graphics hardware is to render what is potentially visible, saving on the processing of all those vertices that are not visible anyway. Furthermore, this can potentially improve the performance of the application since only the vertices that are part of the visible part of the 3D world are kept on the graphics card memory, and these are more likely to fit than the whole 3D world.
This test makes sense if the part of the 3D world that is inside the frustum is significantly smaller than the world itself. But what does significantly smaller mean? That depends on the application. In the extreme case when the whole 3D world is always visible, view frustum culling is just a waste of time because there is nothing to cull. But since this culling technique is so easy to implement and the performance benefits can be very significant it is worth a try.
First let's recall the parameters (all floats) of these functions:
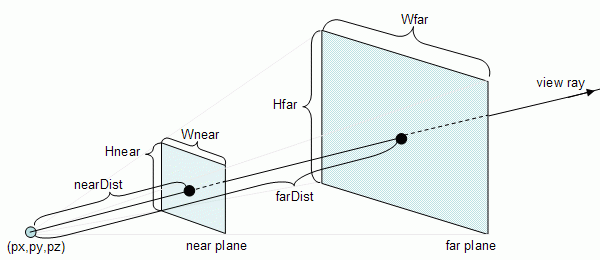
The height and width of the rectangular boundary on the near plane are defined as follows:
	Hnear = 2 * tan(fov / 2) * nearDist

	Wnear = Hnear * ratio
The same reasoning can be applied to the far plane:
	Hfar = 2 * tan(fov / 2) * farDist

	Wfar = Hfar * ratio
In order to perform view frustum culling, two steps are required:
The planes are defined such that the normal points towards the inside of the view frustum. Testing if an object is inside the view frustum is performed by computing on which side of the plane the object resides. This can be done computing the signed distance from the point ot the plane. If it is on the side that the normal is pointing, i.e. the signed distance is positive, then it is on the right side of the respective plane. If an object is on the right side of all six planes then the object is inside the frustum.
In this section the computation of the six planes that define the frustum is provided. Testing will be detailed on the next sections.
An approach is to first determine the eight points that define the corners of the view frustum, and then use these points to define the six planes.
The following figure shows the above mentioned points that may be used to compute the six planes.
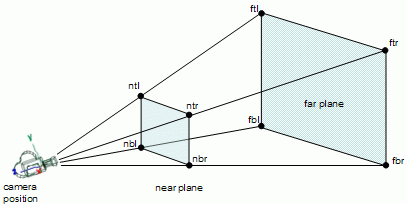
The notation used to define the points is as follows: the first letter indicates if the point is on the near (n) or far plane (f); the second letter states if the point is at the top (t) or bottom (b); and the third letter indicates left (l) or right (r).
Lets recall the information that was collected in the previous section:
The following figure shows how to obtain the point on the top left side of the far plane, point ftl.

To compute ftl all is required is vector math:
	fc = p + d * farDist

	ftl = fc + (up * Hfar/2) - (right * Wfar/2)
The remaining points are defined as:
	ftr = fc + (up * Hfar/2) + (right * Wfar/2)
	fbl = fc - (up * Hfar/2) - (right * Wfar/2)
	fbr = fc - (up * Hfar/2) + (right * Wfar/2)

	nc = p + d * nearDist

	ntl = nc + (up * Hnear/2) - (right * Wnear/2)
	ntr = nc + (up * Hnear/2) + (right * Wnear/2)
	nbl = nc - (up * Hnear/2) - (right * Wnear/2)
	nbr = nc - (up * Hnear/2) + (right * Wnear/2)
An optimization can be performed using this approach to extract the near and far planes. A plane can be defined with a normal and a point, and for those planes these are known based on the camera definition.
The near plane can be defined with d as a normal, and nc as a point on the plane. As for the far plane the normal is -d and the point is fc.
The other planes can also be computed in a more efficient manner, namely by using a normal vector and a point to define a plane. The following code provides the normal for the right plane. As for the point, the camera position, p is a point in all top, bottom, left and right planes (considering a perspective projection).
	nc = p + d * nearDist
	fc = p + d * farDist

	a = (nc + right * Wnear / 2) - p
	a.normalize();
	normalRight = up * a
Both up and a are vectors that belong to the right plane, so their cross product will provide a normal for the plane.
The class header file
class FrustumG {

private:

	enum {
		TOP = 0, BOTTOM, LEFT,
		RIGHT, NEARP, FARP
	};

public:

	static enum {OUTSIDE, INTERSECT, INSIDE};

	Plane pl[6];

	Vec3 ntl,ntr,nbl,nbr,ftl,ftr,fbl,fbr;
	float nearD, farD, ratio, angle,tang;
	float nw,nh,fw,fh;

	FrustumG::FrustumG();
	FrustumG::~FrustumG();

	void setCamInternals(float angle, float ratio, float nearD, float farD);
	void setCamDef(Vec3 &p, Vec3 &l, Vec3 &u);
	int pointInFrustum(Vec3 &p);
	int sphereInFrustum(Vec3 &p, float raio);
	int boxInFrustum(AABox &b);

};
The Methods: setCamInternals
This function takes exactly the same parameters as the function gluPerspective. Each time the perspective definitions change, for instance when a window is resized, this function should be called as well.
#define ANG2RAD 3.14159265358979323846/180.0

void FrustumG::setCamInternals(float angle, float ratio, float nearD, float farD) {

	// store the information
	this->ratio = ratio;
	this->angle = angle;
	this->nearD = nearD;
	this->farD = farD;

	// compute width and height of the near and far plane sections
	tang = (float)tan(ANG2RAD * angle * 0.5) ;
	nh = nearD * tang;
	nw = nh * ratio;
	fh = farD  * tang;
	fw = fh * ratio;


}
The function stores all the information, and computes the width and height of the rectangular sections of the near and far plane and stores them in nh (near height), nh (near width), fh (far height), and fw (far width).
The Methods: setCamDef
This function takes three vectors that contain the information for the gluLookAt function: the position of the camera, a point to where the camera is pointing and the up vector. Each time the camera position or orientation changes, this function should be called as well.
void FrustumG::setCamDef(Vec3 &p, Vec3 &l, Vec3 &u) {

	Vec3 dir,nc,fc,X,Y,Z;

	// compute the Z axis of camera
	// this axis points in the opposite direction from
	// the looking direction
	Z = p - l;
	Z.normalize();

	// X axis of camera with given "up" vector and Z axis
	X = u * Z;
	X.normalize();

	// the real "up" vector is the cross product of Z and X
	Y = Z * X;

	// compute the centers of the near and far planes
	nc = p - Z * nearD;
	fc = p - Z * farD;

	// compute the 4 corners of the frustum on the near plane
	ntl = nc + Y * nh - X * nw;
	ntr = nc + Y * nh + X * nw;
	nbl = nc - Y * nh - X * nw;
	nbr = nc - Y * nh + X * nw;

	// compute the 4 corners of the frustum on the far plane
	ftl = fc + Y * fh - X * fw;
	ftr = fc + Y * fh + X * fw;
	fbl = fc - Y * fh - X * fw;
	fbr = fc - Y * fh + X * fw;

	// compute the six planes
	// the function set3Points assumes that the points
	// are given in counter clockwise order
	pl[TOP].set3Points(ntr,ntl,ftl);
	pl[BOTTOM].set3Points(nbl,nbr,fbr);
	pl[LEFT].set3Points(ntl,nbl,fbl);
	pl[RIGHT].set3Points(nbr,ntr,fbr);
	pl[NEARP].set3Points(ntl,ntr,nbr);
	pl[FARP].set3Points(ftr,ftl,fbl);
}
The function computed the eight corners of the frustum and the six planes according to the algorithm defined in the previous section.
The following (more efficient) alternative may be used to replace the computation of the eight corners and the six planes in the function above.
	pl[NEARP].setNormalAndPoint(-Z,nc);
	pl[FARP].setNormalAndPoint(Z,fc);

	Vec3 aux,normal;

	aux = (nc + Y*nh) - p;
	aux.normalize();
	normal = aux * X;
	pl[TOP].setNormalAndPoint(normal,nc+Y*nh);

	aux = (nc - Y*nh) - p;
	aux.normalize();
	normal = X * aux;
	pl[BOTTOM].setNormalAndPoint(normal,nc-Y*nh);

	aux = (nc - X*nw) - p;
	aux.normalize();
	normal = aux * Y;
	pl[LEFT].setNormalAndPoint(normal,nc-X*nw);

	aux = (nc + X*nw) - p;
	aux.normalize();
	normal = Y * aux;
	pl[RIGHT].setNormalAndPoint(normal,nc+X*nw);
The following function of the class FrustumG shows a possible implementation. The parameter is the point to be tested.
	int FrustumG::pointInFrustum(Vec3 &p) {

		int result = INSIDE;
		for(int i=0; i < 6; i++) {

			if (pl[i].distance(p) < 0)
				return OUTSIDE;
		}
		return(result);

	}
Notice the early way out of the function. If a point is inside the frustum it must be on the right side of every plane, therefore in order to accept a point, all six planes must be tested. However, to reject a point all that is needed is for the point to be on the wrong side of a single plane.
To test an object, all vertices could be tested. If all the vertices are on the wrong side of a plane then the object would be outside the frustum. However this test may be too time consuming for large objects. Consider a car with 10000 polygons, in the worst case scenario 10000 tests would have to be done to reach a conclusion of the whereabouts of the car relative to the frustum.
In this case it is very likely that asking the graphics hardware to render the car would have been faster than performing all the tests and then, on top of it, maybe having to render the car anyway.
Hence for complex objects testing all vertices is not an option, instead bounding volumes are used. Several types of bounding volumes exist, and two of the most popular, for their simplicity, are spheres and boxes.
Finding a sphere that contains all the vertices of the car is an easy task (the average of the vertices is the center of the sphere, and the radius is the distance to the farthest vertex), and testing a sphere is extremelly fast as it will be shown next.
There is a tradeof in here: simplicity of the test implies faster but less accurate testing: the car may be outside the frustum, but the sphere may be partially inside. Less tests imply that potentially stuff that is outside of the frustum will be sent to the graphics hardware. But as long as there is a good match between the bounding volume and the object, this strategy does compensate.
Spheres
Testing spheres is similar to testing points, except for the radius of the sphere. A sphere is out of the frustum if its center is on the wrong side of at least one plane and the distance to the plane is greater than the radius of the sphere. If the absolute value of the distance is smaller than the radius then the sphere intersects the plane, meaning that the sphere is partially on the right side of the plane. Otherwise the sphere is completely on the right side of the plane.
int FrustumG::sphereInFrustum(Vec3 &p, float radius) {

	float distance;
	int result = INSIDE;

	for(int i=0; i < 6; i++) {
		distance = pl[i].distance(p);
		if (distance < -radius)
			return OUTSIDE;
		else if (distance < radius)
			result =  INTERSECT;
	}
	return(result);
}
The function receives as parameters the center and radius of the sphere and tests the distance against all planes.
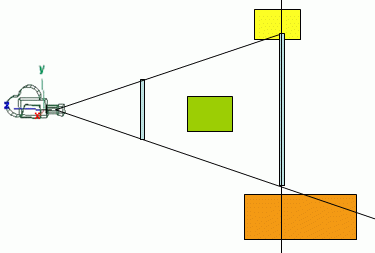
The points of the yellow box are all outside the frustum, yet the box is partially inside the frustum, hence it can't be rejected. A safe way of solving the problem is to reject a box if, and only if, all points are on the wrong side of the same plane. In the figure above it is clear that there is no such plane for the yellow box.
There is a nasty side effect to this solution: in the figure below, the orange box, although totally outside the frustum will not be rejected according to this test. Two options are available: accept these boxes since the cost of testing should be kept to a minimum, or do some further testing.
In here the first solution is taken, hence some boxes outside the frustum are accepted, in order to keep the cost of testing to a minimum (Assarsson and Moller report that they found no observable penalty in the rendering when skipping further tests).
int FrustumG::boxInFrustum(Box &b) {

	int result = INSIDE, out,in;

	// for each plane do ...
	for(int i=0; i < 6; i++) {

		// reset counters for corners in and out
		out=0;in=0;
		// for each corner of the box do ...
		// get out of the cycle as soon as a box as corners
		// both inside and out of the frustum
		for (int k = 0; k < 8 && (in==0 || out==0); k++) {

			// is the corner outside or inside
			if (pl[i].distance(b.getVertex(k)) < 0)
				out++;
			else
				in++;
		}
		//if all corners are out
		if (!in)
			return (OUTSIDE);
		// if some corners are out and others are in
		else if (out)
			result = INTERSECT;
	}
	return(result);

 }
This function is clearly more complex since for each plane, the eight corners of the box may have to be tested. Note that two new variables in and out are declared. These variables track, for each plane the number of corners that fall on each side of the plane. If all points are on the wrong side of the plane then in is going to be zero and the Box can be immediately rejected. If the corners fall on both sides of the plane, then the box is potentially intersecting the frustum. A box will be inside the frustum if for all planes, it is not on the wrong side of the planes, and it is not intersecting any plane.
Testing the points against a plane stops as soon as there are points on both sides of the plane (notice the stop condition on the for cycle), meaning that the box is intersecting the plane.
Testing a single vertex is enough for the cases where the box is outside, and the second vertex needs only to be tested if one requires distinguishing between boxes totally inside and boxes partially inside the view frustum.
So what are these vertices? And how hard is it to find them?
Consider a plane and its normal. The positive vertex is the vertex from the box that is further along the normal's direction. The negative vertex is the opposite vertex.
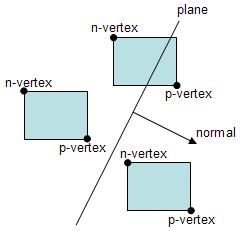
If the p-vertex is on the wrong side of the plane, the box can be immediately rejected, as it falls completely outside the frustum. On the other hand, if the p-vertex is on the right side of the plane, then testing the whereabouts of the n-vertex tells if the box is totally on the right side of the plane, or if the box intersects the plane.
As to how hard it is to find them lets consider two cases: Axis Aligned Boxes (AAB), and Oriented Boxes (OB). In the first case, AAB, it is very easy and computationally inexpensive to find them.
Assume a AAB that has its components x,y,and z varying between xmin and xmax; ymin and ymax; and zmin and zmax. The components of the positive vertex p are selected as follows:
	p = (xmin,ymin,zmin)
	if (normal.x >= 0)
		p.x = xmax;
	if (normal.y >=0))
		p.y = ymax;
	if (normal.z >= 0)
		p.z = zmax:
The negative vertex n follows the opposite rule:
	n = (xmax,ymax,zmax)
	if (normal.x >= 0)
		n.x = xmin;
	if (normal.y >=0))
		n.y = ymin;
	if (normal.z >= 0)
		n.z = zmin:
If the box is not axis aligned, i.e. an OB, then it is more expensive to find these two special vertices. An approach presented by Moller and Haines is to transform the normal into the box's space. So consider the box's three axis, bx, by and bz. To transform the normal into the box's space just perform the projections of the normal onto these axes:
nb = (bx . n, by . n, bz . n)
This new normal in the box's space, nb, is used to determine the p-vertex and n-vertex. For an OB, the test implies three dot products, plus the testing itself that requires one or two distance computations. Still for boxes outside the frustum it should be faster than testing the eight vertices of the box.
Given both p-vertex and n-vertex, the code to find the position of an axis aligned box in a frustum is as follows:
int FrustumG::boxInFrustum(AABox &b) {

	int result = INSIDE;
	//for each plane do ...
	for(int i=0; i < 6; i++) {

		// is the positive vertex outside?
		if (pl[i].distance(b.getVertexP(pl[i].normal)) < 0)
			return OUTSIDE;
		// is the negative vertex outside?
		else if (pl[i].distance(b.getVertexN(pl[i].normal)) < 0)
			result =  INTERSECT;
	}
	return(result);

 }
Note: the fps counter is only altered once per second, so keep your fingers on a leash :-)
As usual the source code is provided as a companion for this tutorial, and it could be optimized in many ways. Also there is no guarantee that it is bug free, or that it will run everywhere.
Having said this, if you find a bug, or some way to improve this (without much work :), or even if you create a port to some other operating system, please let me know.
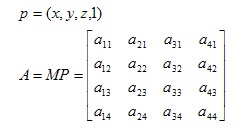
Consider a point p =(x,y,z,1) on the 3D world. Consider also a modelview matrix M and a projection matrix P. The point p is transformed by matrices M and P as point pc =(xc,yc,zc,wc) in clip space using:
The point pc is in homogeneous coordinates, and when normalised becomes pcn:
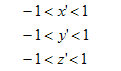
In normalised clip space the view frustum is an axis aligned box centered in the origin, and bounded by the following planes:
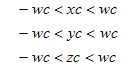
Then the point pc, in non-normalized coordinates, must obbey the following conditions in order to be inside the view frustum:
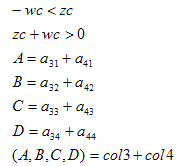
Based on this information it is possible to extract the six planes, in world coordinates, that bound the view frustum. The point pc is on the "right" side of the left plane if
Consider p and A=MP as described below
Then xc and wc can be defined as a function of p = (x,y,z,w), and A.
Therefore the following inequation must be true if p is on the right side of the left plane.
A little algebric manipulation gives
So the left plane (Ax+By+Cz+D=0) is defined as:
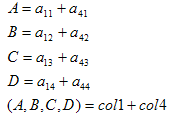
where col1 and col4 are the first and forth columns of matrix A, respectively.
If the only objective is to find out if a point is inside or outside of the frustum then the plane as defined is ok. However when testing spheres, which require computing the distance from the center of the sphere to the plane, it is advisable to normalize the plane.
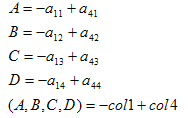
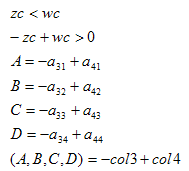
The right plane can be obtained in a similar manner:

The following coefficients are obtained for the right plane:
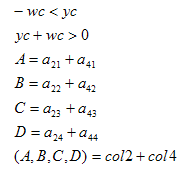
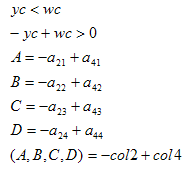
The remaining planes are obtained as follows:
#define m(row,col)  m[col*4+row-5]

void FrustumG::setFrustum(float *m) {

	pl[NEARP].setCoefficients(
				 m(3,1) + m(4,1),
				 m(3,2) + m(4,2),
				 m(3,3) + m(4,3),
				 m(3,4) + m(4,4));
	pl[FARP].setCoefficients(
				-m(3,1) + m(4,1),
				-m(3,2) + m(4,2),
				-m(3,3) + m(4,3),
				-m(3,4) + m(4,4));
	pl[BOTTOM].setCoefficients(
				 m(2,1) + m(4,1),
				 m(2,2) + m(4,2),
				 m(2,3) + m(4,3),
				 m(2,4) + m(4,4));
	pl[TOP].setCoefficients(
				-m(2,1) + m(4,1),
				-m(2,2) + m(4,2),
				-m(2,3) + m(4,3),
				-m(2,4) + m(4,4));
	pl[LEFT].setCoefficients(
				 m(1,1) + m(4,1),
				 m(1,2) + m(4,2),
				 m(1,3) + m(4,3),
				 m(1,4) + m(4,4));
	pl[RIGHT].setCoefficients(
				-m(1,1) + m(4,1),
				-m(1,2) + m(4,2),
				-m(1,3) + m(4,3),
				-m(1,4) + m(4,4));
}

#undef M
The function setCoefficients from the class Plane is as follows:
void Plane::setCoefficients(float a, float b, float c, float d) {

	// set the normal vector
	normal.set(a,b,c);
	//compute the lenght of the vector
	float l = normal.length();
	// normalize the vector
	normal.set(a/l,b/l,c/l);
	// and divide d by th length as well
	this->d = d/l;
}
To extract the matrices M and P from OpenGL state the function glGetFloatv can be used:
	float m[16],p[16];

	glGetFloatv(GL_PROJECTION_MATRIX,p);
	glGetFloatv(GL_MODELVIEW_MATRIX,m);
Matrix multiplication is then performed to compute A = M*P. A simple matrix multiplication such as the one below will do:
void multMat(float *res,float *a, float *b) {


	for (int i=0;i<4;i++) {
		for (int j = 0;j < 4;j++) {
			res[i*4+j] = 0.0;
			for (int k = 0; k < 4; k++) {
				res[i*4+j] += a[i*4+k] * b[k*4+j];
			}
		}
	}
}
The following is a solution for lazy people, using OpenGL to perform the multiplication for you (in my laptop it is actually slightly faster!) :
void multMat2(float *res, float *a, float *b) {

	glPushMatrix();

	glLoadMatrixf(b);
	glMultMatrixf(a);
	glGetFloatv(GL_MODELVIEW_MATRIX, res);

	glPopMatrix();
}
Once the planes are extracted, testing points, spheres or boxes, works exactly as in the geometric approach.
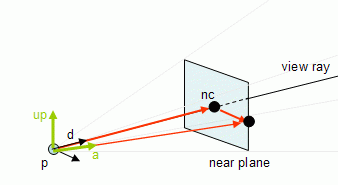
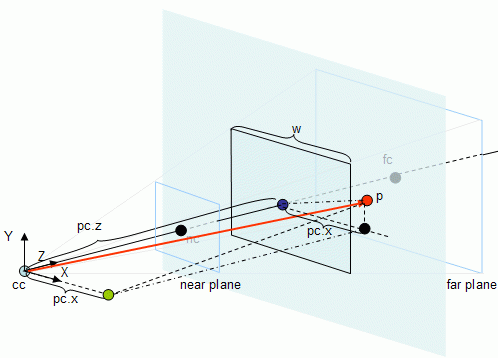
Consider that the camera has a referential based on the three unit vectors: X, Y and Z as shown in the next figure. Notice that the referential in the figure is not a right hand system (as in OpenGL), because the orientation of Z has been reversed to make the tutorial more intuitive.
For a given point p to be tested against the view frustum, the goal is to find its coordinates in this referential and then use this information to find out if the point is inside or outside the frustum.
First the Z coordinate is checked. If the Z coordinate is not between the values of nearDist and farDist then the point is certainly outside of the view frustum, otherwise coordinates X and Y must be tested.
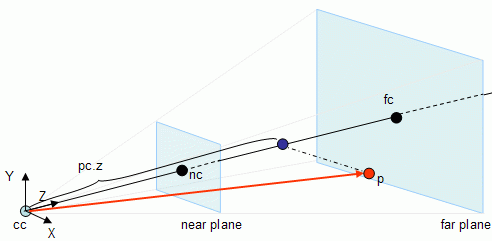
In the image above, p is the point being tested. Consider pc as being the point p in camera referential coordinates. In order to find the Z coordinate of pc, pc.z first it is necessary to find the vector that goes from cc (the camera center) to p, and then the length of the projection of this vector on Z (the projection is the blue point) must be computed. As shown in the lines section of the maths tutorial, this can be done with a dot product (this is valid because it is assumed that Z is a unit vector), hence:
	v = p - cc
	pc.z = v . Z
If pc.z is not between nearDist and farDist then p is outside the frustum.
	if (pc.z > farDist || pc.z < nearDist)
			return (OUTSIDE);
Up to this point the value of pc.z is known, where pc is the value of point p in the camera referential coordinates. To find pc.y and pc.x a similar procedure is used: find the length of the projection of vector v in both the Y and X axis respectively.
	v = p - cc
	pc.z = v . Z
	pc.y = v . Y
	pc.x = v . X
Consider now a side view of the frustum in 2D to simplify the diagram. The horizontal arrow shows the value of pc.z. At that distance from the camera, pc.z the view frustum has a height h.

where a is the horizontal field of view angle.
This implies that, for the Y coordinate of pc to be inside the view frustum,
-h/2 < pc.y < h/2
or, as an algorithm,
	if (-h/2 > pc.y || pc.y  >  h/2)
		return(OUTSIDE)
The width of the frustum can be computed based on the height as
w = h * ratio;
So the X component of pc can be tested with the following if statement:
	if (-w/2 > pc.x || pc.x  >  w/2)
		return(OUTSIDE)
The following figure, although a little bit complex ( ;-> ) provides some information about the components of pc.
This method should be faster than the previous approaches where six planes are tested. In here, only a dot product is performed for each pair of planes, whereas in the previous approaches a dot product was performed for every plane, in the worst case scenario. See the next section for an implementation.
The class header file
class FrustumR{


public:

	static enum {OUTSIDE, INTERSECT, INSIDE};

	Vec3 cc; // camera position
	Vec3 X,Y,Z; // the camera referential
	float nearD, farD, width, height;

	FrustumR::FrustumR();
	FrustumR::~FrustumR();

	void setCamInternals(float angle, float ratio, float nearD, float farD);
	void setCamDef(Vec3 &p, Vec3 &l, Vec3 &u);
	int pointInFrustum(Vec3 &p);

};
The Methods: setCamInternals
This function takes exactly the same parameters as the function gluPerspective. Each time the perspective definitions change, for instance when a window is resized, this function should be called as well.
#define ANG2RAD 3.14159265358979323846/180.0

void FrustumR::setCamInternals(float angle, float ratio, float nearD, float farD) {

	// store the information
	this->ratio = ratio;
	this->nearD = nearD;
	this->farD = farD;

	// compute width and height of the near section
	tang = (float)tan(ANG2RAD * angle * 0.5) ;
	heigth = nearD * tang;
	width = height * ratio;


}
The function stores all the information, and computes the width and height of the rectangular sections of the near plane and stores them in height (near height) and width (near width).
The Methods: setCamDef
This function takes three vectors that contain the information for the gluLookAt function: the position of the camera, a point to where the camera is pointing and the up vector. Each time the camera position or orientation changes, this function should be called as well. Notice how the following function is much simpler than for the other methods of view frustum culling. There is no need to compute the planes anymore.
void FrustumR::setCamDef(Vec3 &p, Vec3 &l, Vec3 &u) {

	cc = p.copy();

	// compute the Z axis of the camera referential
	// this axis points in the same direction from
	// the looking direction
	Z = l - p;
	Z.normalize();

	// X axis of camera with given "up" vector and Z axis
	X = Z * u;
	X.normalize();

	// the real "up" vector is the dot product of X and Z
	Y = X * Z;
}
The Methods: pointInFrustum
Testing a point is also much simpler and more efficient:
int FrustumR::pointInFrustum(Vec3 &p) {

	float pcz,pcx,pcy,aux;

	// compute vector from camera position to p
	Vec3 v = p-camPos;

	// compute and test the Z coordinate
	pcz = v.innerProduct(-Z);
	if (pcz > farD || pcz < nearD)
		return(OUTSIDE);

	// compute and test the Y coordinate
	pcy = v.innerProduct(Y);
	aux = pcz * tang;
	if (pcy > aux || pcy < -aux)
		return(OUTSIDE);

	// compute and test the X coordinate
	pcx = v.innerProduct(X);
	aux = aux * ratio;
	if (pcx > aux || pcx < -aux)
		return(OUTSIDE);


	return(INSIDE);
}
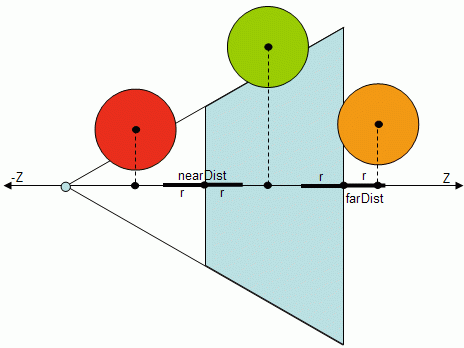
Let's start with the Z component. A sphere has a center c and a radius r. The Z component is the easiest of them all, and it must be performed first since it is required to know the z value of the camera center in the camera referential.
First it is necessary to compute the z component of the sphere center in camera coordinates and this is performed as shown before.
	v = p - cc
	pc.z = v . Z
The only difference in Z testing is the inclusion of the radius in the test condition. If pc.z is not between nearDist-r and farDist+r then p is outside the frustum.
	if (pc.z > farDist +r || pc.z < nearDist - r)
			return (OUTSIDE);
Testing for interception can be achieved afterwards with the following code:
	if (pc.z > farDist - r || pc.z < nearDist + r)
			result = INTERSECT;
Note that when the sphere is outside (red sphere) any of the given planes the testing can terminate, hence the return statement. However an intersection (orange sphere) with the near or far planes is inconclusive without testing the other coordinates first, therefore only the variable result is set in this case.
Testing both x and y components is the delicate part. When both the x and y components are inside the frustum (the figure below shows only the Y axis) then the sphere is at least intersecting the frustum.
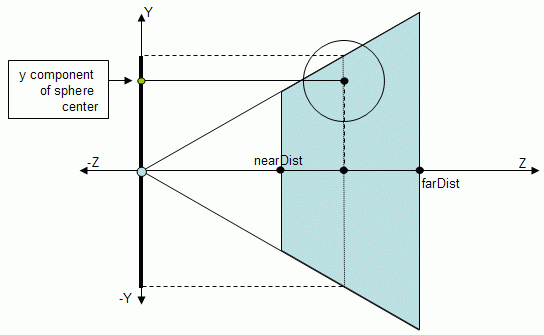
But when is it totally inside, or outside? Consider the following figure where only the top plane is depicted to make the diagram simpler.
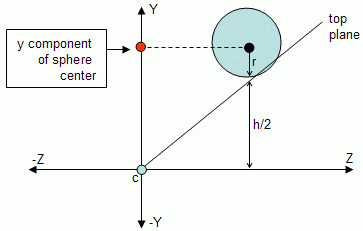
If the only difference comparing to testing points would be the inclusion of the radius, then the sphere in the figure above would be outside when it clearly intersects the frustum. So the following code is not accurate:
	if (pc.z > h/2 + r || pc.z < - h/2 - r)
			return (OUTSIDE);
The following figure shows that the distance we're looking for is not the radius r of the sphere but d.
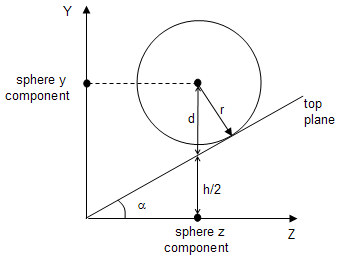
Fortunately d can be computed as a function of the radius and half the horizontal field of view angle (alpha in the figure). The angle between the vectors with the directions r and d is equal to alpha, hence:
d = r / cos(alpha)
Since alpha is know a priori, the term 1/cos(alpha) can be precomputed so the extra computational effort during testing is only a multiplication by the radius. This term, hereafter named the sphereFactorY, needs to be computed when the perspective is set. A similar term for the X axis, sphereFactorX, is also required since the angle is potentially different (unless the ratio between width and height of the viewport is 1). The next section shows the implementation details.
The class header file
class FrustumR{


public:

	static enum {OUTSIDE, INTERSECT, INSIDE};

	Vec3 cc; // camera position
	Vec3 X,Y,Z;// the camera referential
	float nearD, farD, width, height;

	// NEW: these are the variables required to test spheres
	float sphereFactorX, sphereFactorY;

	FrustumR::FrustumR();
	FrustumR::~FrustumR();

	void setCamInternals(float angle, float ratio, float nearD, float farD);
	void setCamDef(Vec3 &p, Vec3 &l, Vec3 &u);
	int pointInFrustum(Vec3 &p);

	// NEW: function to test spheres
	int sphereInFrustum(Vec3 ¢er, float radius);

};
The Methods: setCamInternals
This function is similar to the one presented before, adding only the computation of sphere factors.
#define ANG2RAD 3.14159265358979323846/180.0

void FrustumR::setCamInternals(float angle, float ratio, float nearD, float farD) {

	// half of the the horizontal field of view
	float angleX;
	// store the information
	this->ratio = ratio;
	this->nearD = nearD;
	this->farD = farD;

	angle *= ANG2RAD;
	// compute width and height of the near and far plane sections
	tang = tan(angle);
	sphereFactorY = 1.0/cos(angle);

	// compute half of the the horizontal field of view and sphereFactorX
	float anglex = atan(tang*ratio);
	sphereFactorX = 1.0/cos(anglex);
}
The Methods: sphereInFrustum
This function takes the center of the sphere and its radius and tests the sphere against the view frustum.
int FrustumR::sphereInFrustum(Vec3 &p, float radius) {

	float d;
	float az,ax,ay;
	int result = INSIDE;

	Vec3 v = p-camPos;

	az = v.innerProduct(-Z);
	if (az > farD + radius || az < nearD-radius)
		return(OUTSIDE);
	if (az > farD - radius || az < nearD+radius)
		result = INTERSECT;

	ay = v.innerProduct(Y);
	d = sphereFactorY * radius;
	az *= tang;
	if (ay > az+d || ay < -az-d)
		return(OUTSIDE);
	if (ay > az-d || ay < -az+d)
		result = INTERSECT;

	ax = v.innerProduct(X);
	az *= ratio;
	d = sphereFactorX * radius;
	if (ax > az+d || ax < -az-d)
		return(OUTSIDE);
	if (ax > az-d || ax < -az+d)
		result = INTERSECT;

	return(result);
Note: the fps counter is only altered once per second, so keep your fingers on a leash :-)
As usual the source code is provided as a companion for this tutorial, and it could be optimized in many ways. Also there is no guarantee that it is bug free, or that it will run everywhere.
Having said this, if you find a bug, or some way to improve this (without much work :), or even if you create a port to some other operating system, please let me know.
As shown throughout this tutorial is easier to do tests with spheres than it is with boxes. Therefore, if a large number of boxes will normally be outside the view frustum, then a bounding sphere should be considered as a possible optimization. Testing a sphere requires only a distance computation against more complex calculations for the box case.
If the sphere is totally outside of the frustum (case A) then the box is also totally outside the box. If the sphere is totally inside the frustum so must be the box (case B). When the sphere intersects the frustum walls two options are available: consider that the box also intersects, which may be false (case C), or test the box itself.
Only in this latter case, sphere intersecting the frustum walls, there is a penalization for using a sphere as a bounding volume for the box. In all the other cases the test is faster. Note that this optimization should be used with care when considering long skinny boxes, since in this case a sphere is not the best bounding volume.
Spheres everywhere
Sphere-sphere test is also very fast: just sum the radius of both spheres and compute the distance between the two centers. If the distance is larger than the sum of the radius then the spheres are separated.
Based on this, one could consider a bounding sphere for the frustum itself. Then a first test would be to check if the object's bounding sphere is outside the frustum's bounding sphere, and in this case reject the object immediately.
However this test should be used with care since the sphere that is bounding the view frustum is significantly larger than the frustum itself. Nevertheless if the frustum is small compared to the 3D world then it makes sense to use this as an initial test.
Axis-Aligned Boxes everywhere
Computing an AAB as a bounding volume for an object (or frustum) is extremely easy, just compute the minima and maxima for each axis.
Testing if something is inside of an AAB is also very simple and it doesn't involve distance computations. Just check if there are overlaps on each axis. Consider an AAB bounding volume, or just AABB, for the frustum, fb and an AABB for an object ob. The following algorithm performs the intersection test:
if (fb_xmin > ob_xmax || fb_xmax < ob_xmin ||
	fb_ymin > ob_ymax || fb_ymax < ob_ymin ||
	fb_zmin > ob_zmax || fb_zmax < ob_zmin)

	return (OUTSIDE);

else if (fb_xmin < ob_xmin && fb_xmax > ob_xmax &&
		 fb_ymin < ob_ymin && fb_ymax > ob_ymax &&
		 fb_zmin < ob_zmin && fb_zmax > ob_zmax)
	return (INSIDE);
else
	return(INTERSECT);
If the result is OUTSIDE the case is closed. Otherwise, when the result is INTERSECT or INSIDE, then further testing is required.
As for the case when a sphere was proposed as a bounding volume for the view frustum, some care must be taken to check if a bounding box is an appropriate bounding volume for the view frustum. Oblique, long and skinny frusta are not particularly suited.
Floats and precision (or lack of it)
When computing the relative position of objects regarding the frustum in this tutorial comparisations such as " > 0" or " < 0" were used. Note that due to the limited precision of numbers in computers something that is slightly outside of frustum may be reported as inside, and vice-versa. It will only happen when there is a very close call, but it will happen eventually. Two solutions: never mind because these cases are such a close call that no one cares; be extra conservative and give a tolerance, i.e. consider a slightly larger frustum.
This latter solution, increasing the frustum can be achieved in several ways. For instance the planes themselves can be pushed a little bit further away, inflating the view frustum, by adding a small vector ( a fraction of the plane's normal) to the points that define the plane. Another solution is to change the way the comparisons are performed, for instance instead fo testing " < 0" test " < -0.001".
Precision increase is possible using doubles instead of floats, but all the math for the tests becomes more expensive.
Plane Coherence
If an object is rejected by a plane, and the camera moves slowly it is likely that the object will be rejected by the same plane again. If this is true then the first plane to be tested should be the one that led to rejection in the previous frame. To implement this strategy it is enough to store in each object the last plane of rejection.
This reasoning can be detailed observing the type of movements performed by the view frustum. Assarsson and Moller consider the two possibilities separately: rotation and translation.
Rotation Coherence
This approach is based on the camera's rotation. When an object is rejected by the left plane and the camera rotates a little to the right then the object will be out of frustum again.
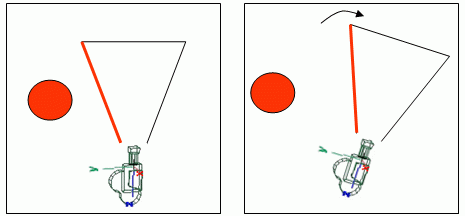
However this approach should be used with caution. If the camera keeps rotating to the right, the object will eventually be inside the view frustum again.
If the rotation is not restricted to any of the axes it is hard to keep track of it, hence it is probably simpler to use a timestamp, and keep the record of the plane only for a small amount of time.
Translation Coherence
If an object is rejected by the near plane, i.e. it is behind the view frustum, and the camera translates forward then that object will be out of the view frustum for sure.
When the view frustum is translated, the planes are translated by a certain distance (a different distance for each plane in the general case). Lets assume that when the view frustum was translated, the left plane was translated by d, where d is the signed distance between the left planes in two consecutive frames. Then if a bounding volume was at a signed distance d0 in the last frame, in the present frame the distance from the bounding volume to the left plane will be d' = d + d0.
This approach can only be applied if the distances from the bounding volume to the planes are kept, which requires extra storage to keep them. Furthermore, since the bounding volume is not necessarily tested against all the frustum's planes (or tested at all) these distances may be unknown.
Conclusion
Several methods and optimizations we're presented in this tutorial. There are many solutions and often they present a trade-off between the accuracy of the test and its computational expense.
One thing to have in mind is that plane extraction is going to be performed once every time the camera moves. On the other hand testing is going to be performed n times per frame (n being the number of things to test) and n can be quite large. So to optimize view frustum culling, the main focus should be on the testing side, as this is going to take the lion's share of the time taken to perform view frustum culling.
To properly tune an application requires testing and measuring times, and a good degree of feeling. Hope the tutorial has helped someone out there to get a better grasp of the view frustum culling process.
The book from Moller and Haines, Real-Time Rendering 2nd ed., is a very complete source of information.
Assarson and Moller wrote an article on this subject Optimized View Frustum Culling Algorithms for Bounding Boxes, published in the Journal of Graphic Tools where most of the optimizations mentioned here are presented.
The document from Gribb and Hartmann, entitled Fast Extraction of Viewing Frustum Planes from the World- View-Projection Matrix has been around for some time and explores the extraction phase of the view frustum planes both for OpenGL (as detailed in this tutorial) and Direct3D.
Mark Morley had a document called Frustum Culling in OpenGL, but I can't find it anymore. It used to be here.
Daniel Sýkora and Josef Jelínek have published a work entitled Efficient View Frustum Culling where besides providing information about the view frustum culling process, also provide test results on some optimizations.
Eric Lengyel, in the book Mathematics for 3D game programming and Computer Graphics has a section on plane extraction.
Dion Picco has written an article for Flipcode called Frustum Culling where some optimizations for the testing phase are discussed.
Game Programming Gems 5 has an article by Frank Puig Placeres, entitled "Improved Frustum Culling" where the "radar approach" is introduced.